Sunday, February 27, 2011

Design Considerations/Simple Armature

Lets look at some of the design ideas that I laid out yesterday in a bit more detail today.
SIZE - I have found that 14 gauge electric fence wire works well as an armature for most sizes of sculpture. I now sculpt most of my figures in the 10-14" size and this size wire works well as an armature without the need to twist wire or add extra support as long as you are doing a simple POSE.

                                                                    SIMPLE ARMATURE

This is the outline of a simple 14 gauge armature. It consists of three parts which are foil taped together along the spine of the figure. This armature will hold most figures just fine until you start doing extreme poses or reach the 14" height. Please note that the leg wires will need to be longer to insert into a base.


This 8" tall fairy is built on this simple armature.


                                                              THE AUGMENTED SIMPLE ARMATURE

 This is an augmented simple armature we laid out on our proportion chart in a previous post. The wire parts are the same as the simple armature but two brass tubes have been slipped over the leg wires for more support. (If the figure is holding another figure, the arms can be covered with tubing as well to support the next figure.) These tubes run all the way to the bend at the neck before the hip bends are made in the tubing/wire.


       This figure uses an augmented simple armature to add strength to the legs and hips.


 Here are three examples of the simple armature used to do different designs:

This figure is built on a simple wire armature. She is seated and has a soft cloth body so the only stress on the clay and the armature is in the head/chest area and the lower arms and legs. The simple armature can easily support the stress in these areas.


This figure is a good representation of a standing figure which would use a simple armature. He has a sculpted body but the body is then covered with a costume. He is about 14" tall so the simple armature will work just fine. The thing to keep in mind with this figure is that he may crack at the knees, hips, and shoulders from stress with an unsupported simple armature. To avoid this, he has control joints cut into his body at those points to allow the internal stress to be released at the joints rather than crack the figure. A control joint is much like the joint which masons place in sidewalks so the slab will crack in squares rather than a random pattern when it freezes and thaws. The control joints are then covered with the costuming.


This figure is also a standing figure but is nude so she needs lots of rigidity inside her so she will not crack. The simple armature will work on her but it needs to be augmented once the size of the figure passes the 10" tall mark.


This is the extreme use of the simple armature. In this case the armature supports a figure but we add a rigid rod which passes through the figure to support the figure above it. In this case, the rod bypasses the lower figure so the stress of the upper figure does not impact the body of the lower figure.


This is the almost finished image of the "bypassed simple armature" in use.
Hope this answers a few questions and opens your minds to a lot more unanswered ones. Next time we will look at a more advanced armature.
Have a great day!

Saturday, February 26, 2011

Design and the Armature

"Creation"- Mark A. Dennis
All your armature decisions will be dictated by the design of your final sculpture. I know that some of you are scoffing right now because you want to be creative and let the ideas flow as you work your piece into creation. Right there with ya! However, you cannot sacrifice the internal mechanics of science while creating that wonderful piece of art.The best sculptures need to be supported so they last. This is the job of your armature.
Here are a few ideas you must address while choosing the type of armature to support your sculpture.
"Belledonna" Life sized portrait - Mark A. Dennis
                SIZE  How big is your final figure going to be. As the figure get larger the armature must become more rigid to avoid cracking or the armature must become segmented (ball joints) to isolate the stress on each component of the piece.
                MATERIALS What brand or brands of clay are you using. You must become intimate with the properties of the clay, clay mix, epoxy, wax, casting resin, (insert material here) that your finished sculpt is made of. The only way to do this is to test your material yourself! Experiment with different clays; which surface finish do you like, how thick can it get before it cracks, what happens to it at different temperatures, how much bend is there in the final product, etc... You need to know this before you can decide how rigid, and how thick the armature and padding of the torso need to be. Ask other artists, they have done a lot of the experimenting for you but do not rely on their word alone, test this for yourself!
"Under the African Sky" - Mark A. Dennis

                 POSE   What is the figure or figures doing? Is this a simple figure standing on both feet or a series of figures holding each other off the ground? The armature will need to be adjusted to each use based on action, balance, positioning, torque, force, weight, and all those other physics therms which we learned just to pass the darn test.
"Midsummer Night" 18" figure with small fairies-Mark A. Dennis
                SHIPPING  The least considered but just as important feature to think about. If you sell this, which I assume is your goal, how are you getting it to Denmark from Detroit? Smaller sizes are easier to ship and cost less. Larger pieces are big, bulky, expensive, get damaged more easily, and need to break into little parts to ship.

Hope this primer gets you thinking about what goes inside a bit more. Next time we will start with a nice simple armature. Have a great day!

Sunday, February 20, 2011

PROPORTIONS (a simple guide?)

Some of you asked about sizing the skull for the body. I just sort of do what looks good but figured that some of the newer artists may want some idea of how the propotions work.
Keep in mind that this is simply my observation of a lot of human bodies over the past 30 years of sculpting. I am not an expert nor am I a "professor" of anatomy. This is simply what works for me.
This is the proprtion for a young woman. Proportions will vary from person to person and from age to age.

For small figure sculpting, I like a model of about 7.5 to 8 "heads" high. Head height works well as a scale because most of use like to sculpt the head before we make the body so it is easy enough to use the finished head as the measurement.
The bottom of the torso in the front of the body is about 4 heads high or half of the total length of the figure.
The Torso itself - minus the actual head, is divided into three "head" lengths with the nipples located at the upper head line (2 heads down from the top of the figure). The navel is located near the second head length (3 heads from the top of the figure) as is the hip bone which is actually the top of the pelvis not the hip joint. the Hip joint itself is located about 3.5 heads from the top of the figure. This is important because all leg movement will happen at this point. Not at the hip bone or the bottom of the backside.

Once you have the placement of the hip joint, the leg is two roughly equal sections from the hip joint to the knee and from the knee to the ankle. (SEE "A" on the diagram)
The ankle is less than a quarter of a head height from the bottom of the foot.
While we are down here, lets note that the backside actually sits lower on the torso than the crotch in front. The plane of the bottom of the pelvis runs front to back in an arc. The labia and anus are located on this plane. The muscle and fat of the backside then swell below that plane so the anus is covered and protected. This swelling makes the curve of the backside lower than the crotch on the front of the torso.


The arm is also two roughly equal length parts. The shoulder is located about 1.25 heads down from the top pf the figure. This is the outer terminus of the collarbone. The wrist is located at the crotch line which is 4 heads down from the top of the figure. The length between the shoulder and the crotch is cut in half and that locates the elbow for us. (Easy way: elbow hits the waist of the figure) See "B" on the diagram.


 Now an easy way to scale your figure: Decide what size your finished figure will be. In this example I am using a piece of 8.5x11 inch paper.
Fold it in half from top to bottom so you have an 8.5x5.5" folder paper.

Fold in half again (8.5x 2.75)
 Fold in half again (8.5x 1.375)
 Now you have a piece of paper folded every 1-3/8" so you have eight sections.

Notice how this coincides with your proportions for the figure.
Now you know instantly what your head height is for a finished figure. It is 1/8th of the final size.
To allow for variations in sculpting techniques, you will want to make the skull slightly smaller so you have room to add clay to get the face to look like you want. Therefore, a skull for this figure would be about 1.25" high.


Now you can make your armature to scale so it fits into the proportions of whatever size you want for your finished figure.
Hope this helps! Have a great day!

Tuesday, February 15, 2011

TEETH

To those of you who are regular viewers, I offer a sincere apology for not posting new information. We are in the final weeks of our production of The Music Man and have missed almost two weeks of set construction due to snow so I must go in to the school during the day to get the set finished. I will try to keep posting new information but it is getting harder to sculpt right now.
Lets get to the teeth now.
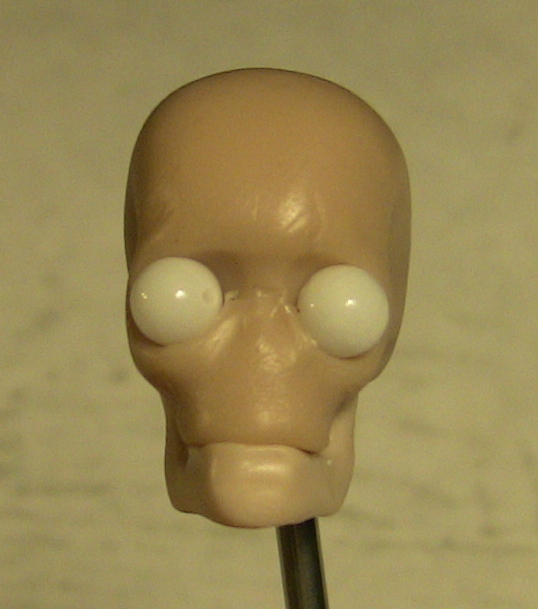
This is the cut-down jaw image we ended with last time. We should note the forward taper of the mouth area. On Mongoloid and Negroid skulls the mouth area may project even farther forward.
Please notice on the front view that the surface of the upper jaw aligns roughly with  the center of the eye. This is where we will be applying the teeth.
To make a full tooth sculpt easier, I have removed the lower jaw.
Wet the bottom of the upper jaw area with liquid Sculpy.
Roll out a small tube of tooth clay. For teeth I use a mix of white and translucent clays.
Press the tube onto the bottom of the jaw area following the curve of the mouth.
 Use a tool to pull the clay up onto the front of the tooth area keeping a flat front which follows the curve of the mouth.
 The back of the teeth are sloped to the top of the mouth. Take a moment to cut the proper shape of the teeth. The rear teeth are wider and drop rather straight down from the jaw. The teeth become more tapered and angle away from the mouth as you go toward the front of the face.
 Use a knife to score each tooth on the clay strip. Start in the center with the front teeth being sure the center line aligns with the center of the face.
Follow the rules of the teeth as you score them:
The adult mouth has 32 teeth -unless the wisdom teeth are pulled. 16 top, 16 bottom
The teeth are symmetrical - the same on each side.
The lower front teeth are slightly smaller than the upper incisors so they will fit slightly behind them when the mouth shuts - unless you are doing a character sculpture with odd teeth.


Teeth are numbered from 1-32 starting (as you are facing someone else's skull) on the left upper back molar. Notice the size and shape differences of the teeth. Molars are big and chunky (1-3, 14-19, 30-32), as you move forward the premolars (4,5,12,13, 20,21,28,29) are slightly smaller molar shaped teeth. The canines (6,11,22,27) are our fangs - for those vampire sculptors. They are narrower and kind of pointed. The incisors (6-11, 23-26) are  shaped like chisels with the two upper front teeth (8,9)  slightly wider than the other incisors.
Using these guides, we continue the scoring onto the inside of the mouth (please note that I have omitted the wisdom teeth so my mouth has only 28 teeth). I prefer to leave the teeth fused together for strength.
 Use a small, flat tool to round the front surface of each tooth from side to side.
The teeth also taper from side to side toward the jaw.
The back of the teeth are rounded from side to side as well. Molars have an indentation in the top surface. Compare the right side teeth to the left side and you can see the roundness and depression in the molars compared to the rough teeth on the left.
Once these are finished, I prefer to cure the upper teeth so I can shape the lower teeth to the uppers without damaging the finished teeth.
 The lower jaw is wet with liquid Sculpy and a roll of clay is applied. The teeth are tapered and shaped like the first few steps of the upper jaw. The lower jaw is pressed into the upper so the teeth will imprint the lower molars so they fit together. This image shows the lower jaw after pressing against the upper.
 The teeth are scored and rounded like the top following the guidelines of the tooth model above.
While the jaws are apart, I have added the tongue. Finished teeth are cured and ready to attach the jaw to the skull. 
 The joint area is wet down with liquid Sculpy and a piece of clay is placed between the jaws.
* Note how the lower teeth fit behind the front teeth.
Align the jaw front to back and side to side.
 The mouth is opened to whatever width you want for the sculpture.
Be sure the mouth is opened along an arc using the the jaw joint as the pivot for the lower jaw.
Cure the jaw joint.
You are ready to add the face on your shull.
Hope this is helpful. Have a great day!

Thursday, February 10, 2011

Back to Basics (Skull)

 Many of you have asked about details on the skull so here it is.
This skull will be about 1-1/4" high.
Start with a ball of clay about 1" in diameter.
** If you have hot hands you may want to let the clay rest between steps!
 Press the sides of the ball in slightly.
Cut the front off the ball.
 Cut a notch out of the lower back of the ball.
Use a flat tool to round off the front of the ball on both sides where you made the cut.
Form a depression across the face of the ball at the halfway point from top to bottom.
Form the eye sockets with a rounded tool. This is a burnishing tool for applying stencils. The sockets will be on the depression you just made. Press in to the skull and pull slightly down and toward the sides. The socket needs to fit a 6mm bead or your pre-made eye.
Use a sculpting tool, flat blade or burnishing tool to flatten the area under the eye socket. I use the burnishing tool so the bottom of the eye socket will have a rounded ridge.
Work your tool around the outside of the socket to depress the skull and leave a ridge around the socket.
This is the finished side with planes flattened and ridge raised.

Insert the eyes or beads into the skull. The eyes should have one eye width between them. Push out or in depending on which you need to achieve this.
Do not embed them deeply. If you leave them raised from the skull, you can have forward set eyes in the finished sculpture. If you want deep set eyes, it is better to add more clay when you sculpt the face.
 Measure from center to center on the eyes. Use that same measurement to mark the mouth location by measuring down the face from the center of the eye.
Cut the mouth into the clay.
** If you do not want an open mouth, simply score this line across the face.
The head should be stuck on a skewer or similar support at some time during the process so you can hold it without adding heat to the clay and so you can attach it to the armature of the torso later.
Come in halfway from the front of the skull to the notch we cut out earlier and and cut or score a line from the mouth up the jaw to a point about even with the bottom of the eyeball.
Continue the notch we cut earlier (or score along the same line) from the back of the jaw to the vertical line we just made. This will let the lower jaw separate from the skull. If you want a closed mouth do not bother with this step of separating but just score the lower jaw in place.
 Use a sculpting tool or your fingers to gently reshape any distortion which cutting or scoring may have made on  the jaws.
This is what a finished skull should look like for most of your adult sculptures. You can adjust the skull for Negroid and Mongoloid features if you want. I find it easier to make one type of generic skull then alter the features in the face sculpting stages unless the mouth is open and you need to see the teeth.
 Finished skull from the front.
Teeth can be applied to the front of this skull at any time either before curing, after curing, or even after the face is done if you only see a little bit of the teeth.
 If you want an open mouth the next step is to separate the jaw and shape the oral cavity in the palate and lower jaw. Teeth can be added now, after curing, or even after the face is done if you want.
TEETH: If you are setting teeth into an open mouth before sculpting the face you will need to remove the height of the teeth from the upper and lower jaws. This makes the face shorter as shown in this image.
the skull should be cured before adding teeth or sculpting the face.
Next: Teeth.
Have a great day!