Saturday, April 30, 2011

SORRY!

Hi, just a quick update to those following our "demon" sculpt. Had to take some time off to get sculptures finished for the Doll and Teddy Bear Artist & Collector Convention in Philly next month. Attempting to get two sets of figures finished: my OZ pieces and Alice in Wonderland set. Here is the Wizard from the oz set.

I am working off the Wicked book for my concept. Adding a touch of steam-punk, a bit of fantasy, and maybe something good will come out of the studio.


 Yesterday's sculpt of the lion. Off to the oven for him.


Hope you all have a great day, and that some of us will meet in Philly on May 12-14.
Mark

Thursday, April 21, 2011

Child Limbs

Lets look at the proportions for the limbs before we go on.
LEGS- to get a simple measurement and location for the knee, use the head height from the crotch to the knee (number 4 on the drawing). Keep in mind that the upper leg extends past the crotch to the hip joint or a measurement of 1-1/4 heads in this case. The lower part of the leg is the same length of 1-1/4 heads to the ankle joint. The ankle to bottom of the foot is going to vary but should be about 1/8th of a head high.
ARMS- For most figures, the following rules apply: the shoulder joint is located at the end of the collarbone. This is the start of the upper arm. The shoulder muscle (deltoids) will make the shoulder slightly higher than the joint.
The elbow hits the space between the ribcage and the hipbone (pelvis) on the side of the body. On the drawing this is shown by the two faint lines on the side; the downward arching one is the bottom of the ribcage, the upward arc is the top of the pelvis. Use that same measurement from the shoulder joint to the elbow as the measurement from the elbow to the wrist.
!!!!NOW, take all the proportions and rules I have laid out and disregard them!!!!
Every person I have met has a slight variation to the length of the toros, legs, and arms. You must adjust the "rules" to create a body which pleases you. BE AN ARTIST! Experiment with the form and make art which is beautiful to you. I give you permission to ignore all the rules for the sake of your artwork!

Having said that, lets take a quick look at how to manipulate the clay into some kind of humanoid limbs.
 Condition your clay and press it onto the armature. Add a little more clay than you need.
 This is not the pretty stage, just get the warm clay on the wire without air bubbles under it.
Use a very sharp knife to cut the profiles of the limbs. A dull knife will rip the clay and leave white marks in your finished surface.

Let the clay cool before you do your final shaping and smoothing or you will be pushing hot clay off the armature as you attempt to finish the sculpture. Work back and forth from limb to limb to let the clay cool as you finish them.

 Have a great day!
Mark

Tuesday, April 19, 2011

Sculpting the Wee child

Back to our little creation now that anyone following along has had time to make an armature; I hope. Once again, I am sorry for the quality of the images. One camera won't focus all the time and the other stopped working. I am sending them one at a time for repairs as the funds allow.

 When last we met on these pages we completed our armature for the child in our story of the psyche (not sure if it be human or monster psyche).
 As you can tell, the little child is in motion- notice the figure is blurry...motion, get it?
What can I say, one of those days again. Meds time yet?
So, condition a ball of clay and apply it to the torso of the armature. We want as uniform a layer of clay (about 1/4- 3/8 inch thick) as we can get. Be sure to press out any air which may be trapped between the clay and the armature.  Let the clay run onto the upper legs and arms as well so the transition from torso to limbs can be sculpted easier.


 Once the torso has an even layer of clay, lay out the center line of the body from the neck to the crotch being sure to follow any slight twist of the body.
Keep in mind that my wee one is moving (skipping, running, whatever) so the hips will be tilted from side to side as the center of balance is shifted during the raising of the leg. The torso also twists slightly as the lifted leg is brought forward. Skipping and running use two different approaches to hip movement. While running, the hips should remain almost level to conserve energy as the trailing leg is brought forward. The result is that the hip drops slightly on the trailing leg. If you look at my skipping child, you notice the trailing hip is higher. Skipping requires that the person hop forward so the trailing hip is raised so the center of balance is positioned over the planted foot. The waist will then bend to shift the ribcage over the hips to attempt to keep the core of the torso centered so the body will not fall over.
The main body mass markers of collarbone, ribcage, and pelvis are laid in at this time as well. (1 head height from collarbone to bottom of sternum, 1 head height from sternum to bottom of crotch for our child)
 The back gets laid out  as well following the twist or tilt of the waist and hips.
 Side view; just in case you had not figured this out yet.


Basic sculpting is done to the torso. Notice the smaller ribcage, swell of the tummy and rather straight sides from armpit to hip. If you are really observant, you will notice that I have added some clay to the neck and stuck the head on as well.At this time our child is neither male nor female so there is not genitalia.


 Torso from the back.
And the side.
We will do a little on the arms, legs, and fitting the demon support rod into the support tube when next we meet. Okay, your turn. Catch up!
Have a splendid day!
Moi!

Sunday, April 17, 2011

Head (or other parts)Cracking Issues

In a previous posts, Fran asked about getting cracks in the finished head. After about 300 figures now, I have found that it is important to keep your clay covered with plastic after sculpting the face; or the rest of the figure for that matter. Polymer clay loses oils as it sits out in the open. The longer it sits around, the more crumbly and cracked the clay will become. I use a polymer clay skull under my faces which sucks even more oils out of the clay if it sits around too long.

This head was sculpted then sat in a sealed baggie for about a month before curing. The entire backside of the head is covered in a pattern of cracks. In most cases, I would throw this out but the piece I am working on is going to be a bit dirty and unusual (for me anyway) so I can use the head with a few repairs. In fact, I want to give his face a scar so this will be fine to repair and use.
 The first step is to remove the square edges on the sides of the cracks by using a sharp blade to bevel each side.
A very thin coat of Liquid Sculpy is brushed into the crack and onto the surface of the head. This product puffs up as it cures so if you put too much in, the repair will rise above the surface of the skin and look like a raised scar. (Good to know if you want scars)


 The cracks are filled with clay.
The surface of the repair is blended into the surface of the head. The finished repair is cured with a heat gun.
The repaired head is attached to the body I made last night and is ready to go into the oven to cure.
The repair will show but they can be covered well with washes of color. This head was sculpted out of ProSculpt Caucasian clay and repaired with ProSculpt Baby clay so there will always be a difference in the color. Again, for this piece it will only add to the feel of the finished piece but for a pretty lady, I would start from scratch.


Generally, I prefer to sculpt a piece on the first day then let it sit overnight under a plastic bag to keep the oils in and the dog hair out. The second day I make changes to the piece and cure in the oven. This way my clay does not start to dry out so I help to minimize the chance of cracks.
Hope this helps. Have a great day!
Mark

Thursday, April 14, 2011

Child Armature

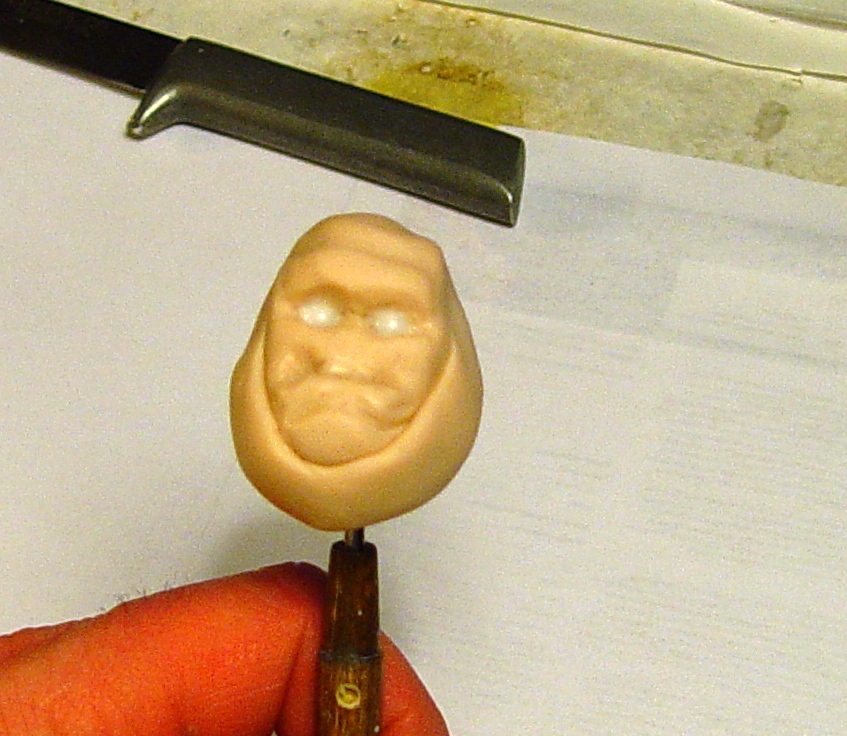
Now that I have the two heads made in proper proportion to each other, I can made the armature.

 We want start with a 5/32 brass tube which will be the outside of the support for the entire load-bearing portion of the sculpture. This tube runs from inside the base to the shoulder where the rod for the demon will insert into it.
Using my proportion chart with the armature drawn on it, I mark the bends on the tube and cut it off at the proper length on the bottom.
Inside this tube will be a brass support rod to stiffen the tubing and act as s top for the demon support rod. The support rod is cut about 3/4" shorter than the tube so the demon support rod can insert into the top of the tube by about 3/4".
This rod is a brass alloy welding rod which fits snugly inside the tube. Welding rods can be found at most home centers, or welding or farm supply stores.
 The rod is inserted into the tube and together they are bent to match the profile of the drawn armature.


 Here is the support tube/rod with another short length of 3/16 tubing over the bottom 1/2" so it will fit into my work base.
Using my demon drawing as my guide, I bend another length of the welding rod for the demon support.
This is the demon support placed into the tube/rod assembly.


 For now I will cut a 5/32 tube to length which fits into the hole in the demon skull and slides down over the support rod so I can see the height of the finished piece as I sculpt.
 This is the basic support system for the sculpture. The two body armatures will attach to the 5/32 tubing.
I now take a 14 gauge wire and bend it to create the torso and leg part of my child's body armature.


Another 14G wire is bent for the torso, shoulder, arm section of the armature.
The lower portion of the armature is attached with foil tape. You can solder these together to the tube if you want but the tape works just as well.
The torso portion of the upper body armature is overlapped on the lower section of armature and they are taped together as well. A short wire is inserted into the taped area to act as the neck.
Notice that the armature is attached in front of the demon support rod coming out of the shoulder so the rod can re pulled straight up and out of the tube.


The armature from the front shows how the child's body is tilted to give the feeling of movement to the figure.
 The armature is padded slightly with foil to bulk out the figure. We want about 1/4" of clay at any point on the finished figure.

The entire armature is wrapped in masking tape to keep oxidation from the wire, foil, and tubing from getting into the clay.


The finished child armature is ready to add clay...next time.
Sorry for the bad photos lately but my good camera needs to be repaired and I am using my old camera with focus issues.
Have a great day!
Mark

Wednesday, April 13, 2011

Child face

Before I work on the armature for the set of figures, I want to get my child's face roughed in as well to be sure my finished sizes of child and demon will work together.
Once again I will start with a smaller skull than my normal 12" figure uses and cut down the lower jaw to make it more child-like.
The child's skull is on the right. Notice the smaller lower jaw and increased cranium.


 The child's face follows the same steps as the demon.
Add a layer of clay to the forehead.
Cover the sides of the face with conditioned clay keeping the nose area thinner than the cheeks.


Wrap any extra clay around the bottom of the jaw.
 A small pyramid-shaped piece of clay is added to the nose area and seamed into the facial plane.
 The mouth indent is made below the nose.
On the child's face, the eyes are located about halfway down the face from the top of the head. The nose and mouth separate the lower half of the face from the eyes to the chin into thirds.

This is all the detailing we need for now. More will follow as the figure progresses and tells me what the finished face should look like.
Have a great day!
Mark

Monday, April 11, 2011

Demon head

Now that the rough layout work is done, I like to sculpt the faces next to get the proportion  of one figure to the other correct and so I have the character of the sculpture established. The character is important because it will dictate the adjustments I make to the poses as they progress. I find it is helpful to have the finished size of the head before I build the armature.
I start with a ball of clay which I will condition by kneading and rolling in my palms until it is soft and ready to apply to the skull.


 The clay ball is pressed into a pancake about 3/16" thick. The clay is properly conditioned if the sides of the pancake do not split as you are pressing the ball.
The clay is laid onto the forehead at the tops of the eyes.


 Another pancake of clay is added to each side of the face being careful not to cover the upper lip/nose area with too much clay. The extra clay is worked around the eyeball. Applying the clay in sheets like this will let your final face follow the topography of the underlying skull so you have less work to do to make it look natural.
 The clay is applied to the rest of the face. Notice how the covered face looks like the starting skull.
This critter is slightly on the larger side so I add a layer of clay around the outsides of the face. As we gain weight, the skull stays the same size but a layer of fat builds up under the skin on the extreme outsides and bottom of the face.


 The nose is applied and rough shaping starts on the entire face.
The final character of the face is starting to show as folds and bulky areas are stressed in the face. Keep in mind that folds in skin are rounded on all edges. Do not use a sharp tool and just cut "V" shaped notches in your clay for a fold.


 The mouth is opened slightly for his thumb. All rough sculpting is done now.

Final skin texture  for an old face is done by first adding crisscrossing fine lines over the entire surface of the finished face. These cross in a diamond pattern just like your own skin. Sorry, these are hard to see on this image.

The next step in skin texture is to stipple the skin with a stiff brush. The long fibers of the brush can get into all the nooks and crannies to add pores to the skin. Some areas get stippled harder than others such as the tip of the nose and the beard area for the face since you are dealing with both pores and hair follicles.


 The clay for the ears will need to have some more bend to it than my normal clay so I will use Sculpy Bake and Bend clay added to my ProSculpt. This will let the ears take a bit more abuse in shipping. The color match will be off slightly but since he will be stained with washes, I can adjust the final color just fine. I have used a mix of 15 parts white, 4 parts, yellow, and 1 part red. This is blended into a pinkish mix then mixed 1:1 with ProSculpt Baby clay. The mix will take repeated bending now.
The ears are roughed in before attaching to the head.
Ears are seamed into the head being sure that they are well attached.
Teeth are added using a 1:1 mix of white and translucent polymer clays.

The horns are just straight white Bake and Bend clay so they will not break in the future. They are shaped and detailed before securing into the head clay.
The finished head. You can see the crisscrossing and stippling in this image rather well. Also notice the slightly more pink coloring to the ears.
We will sculpt the child's head next time.
Have a great day!
Mark