
This is a post for Jo who requested info on doing ears.
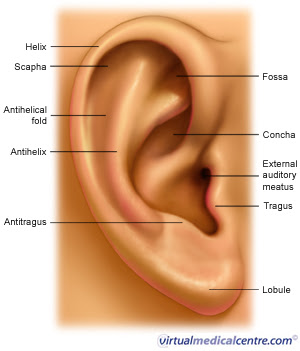 Great illustration of the outer ear parts from: virtualmedicalcentre.com

I made these large enough to show the detailing better.
Form a wedge shaped oval of clay.
 Attach the clay to the head by ramping the clay toward the front of the face.
 Undercut and seam the rest of the ear to the side of the head.
 The ear tapers toward the front of the face.
 The outer helix of the ear is created by pressing a tool down and under the outer ear to form the scapha.
 The complete first step.
 Continue the outer arc of the ear into the inner ear while pushing the extra clay back toward the back of the head forming the concha.
 A ramp runs from the front of the ear down into the inner ear canal forming the external auditory meatus.
 Place a tool in the ear canal and pull down and turn out to establish the depression of the canal and the flap, tragus, in front of the ear opening (part 1).
 Keep pulling forward to raise the front of the ear from the earlobe and ear canal (part 2). This also establishes the antitragus.
 Shape the bottom of the lobe. (Lobule)
 Press an indentation or fossa into the antihelix area.
 Deepen the folds and fossa as desired and do the general clean up.

 Notice how the ear blends into the face area. There is no ridge in front of the ear.
 Hope this helps.
Have a great day!
Mark


I made these large enough to show the detailing better.
Form a wedge shaped oval of clay.


Have a great day!
Mark
Great instruction, been having trouble with ears.
ReplyDeletethanks
thanks, for this tutorial.
Deletebut , The difficulty will be to make 2 ears almost identical !!
LOL
Thanks Mark, very good instructions.
ReplyDeletegracias por el tutorial esta muy bueno ¡¡¡
ReplyDeleteThank you! Very useful!
ReplyDeleteThank you Mark, wonderful instructions!
ReplyDeletewauw ,wonderful instructions
ReplyDeletethanks
marcelline
huge help:-))
ReplyDeleteThanks, Mark!
ReplyDeleteyou are the bomb!!! Thanks, Carolyn
ReplyDeleteThese tutorials are amazing!
ReplyDeleteI have had a brain block when it comes to ears!! Thank you so much! Now let's see if my brain will let me do what I just saw!
ReplyDeleteThanks again
Rose Marie
Thank you!
ReplyDeleteMuchas gracias por el tutorial.
ReplyDeletebesitos ascension
Just came across your site and was gobsmacked at your wonderful creations and to top it all off the information you shared was so helpful. Thanks for sharing your knowhow. ;)
ReplyDeleteHi...just found this page and your website...great tutorial, and thanks! I would like to know where you got your spoon shaped sculpting tool...I have been looking for something just like it. Thanks
ReplyDeleteThat is Jack Johnston's sculpting tool: http://store.artdolls.com/product/johnston-3-1-tool-custom-made/
ReplyDeleteHe also sells the ProSculpt that Mark uses.
You can find some JJ 3 in 1 tools on EBay, they are made by Kemper tools.
I have brought a couple and have sanded one down for smaller work.
~JL
best instustions I have seen yet .thank you for sharing.
ReplyDeleteBrilliant - thank you for sharing.
ReplyDeleteYou make it look so easy! Great tutorial
ReplyDeleteFantastic tutorial Mark. Thank you so much.
ReplyDeleteYou are an Angel!
Thank you very useful
ReplyDeletewow great tut Thank u so much
ReplyDeleteWonderful tutorial! Thank you so much for sharing your expertise, Mark!
ReplyDeleteI love always new way to make thing that help thank a lot!
ReplyDeleteCynthia
Excellent instruction.....thank you for sharing
ReplyDeleteSuper! All those curves always intimidated me, thank you very much :)
ReplyDeleteEste cel mai bun tutorial posibil, este perfect ,felicitari!
ReplyDeleteVery helpful. Thank you.
ReplyDeleteThis fantastic!! Took my ears off and remade them using this tutorial and thye look so much better!!
ReplyDeleteThanks!!
Thank you so much for this tutorial. I love your work and appreciate your willingness to share techniques and information!
ReplyDeleteWhy is one of my ears way higher than the other when viewed from the back of the head when they are both even when viewed from the front and top?
ReplyDeleteAre you refering to yourself or to a bust you have done. While sculpting use a level to assure that parallel to the sculpting base is parallel. Our eyes will trick us on multiple points to using other tools as dividers, calipers as used in wood working to measure distance from one point to another, calipers to measure widths. Inner Diameter calipers I haven't found a use for. Also a vernier caliper for specific measurements I use to assure complete accuracy to the 1/64th of an inch. Micrometers so far I have found no use for and drawing or sculpture. In closing, the level will be your most critical at this time. Know this is very late in years but I hope this might help, and help anyone else who reads these posts.
DeleteWas searching for this! have a small head sculpture in process and the ears will just finish it off. Thank you!
ReplyDeleteThank you so much! I have had a huge problem with ears.
ReplyDeleteThis is the best explanation I have ever seen on sculpting an ear, Thank You!
ReplyDeleteIt is not 2018, Feb, 31. Viet Nam Era Veteran. Nice presentation. Am using Roma Plastine (sp), cold, stone hard to fashion two ears. Following these directions, using antiquated tools and kitchen utinsels to fashion the ears. I could post a picture if it is possible on this site.
ReplyDeleteSorry, it IS 2018, not, not 2018. Just a stupid old man here.
ReplyDelete